How to Do an ’80s Blowout at Home
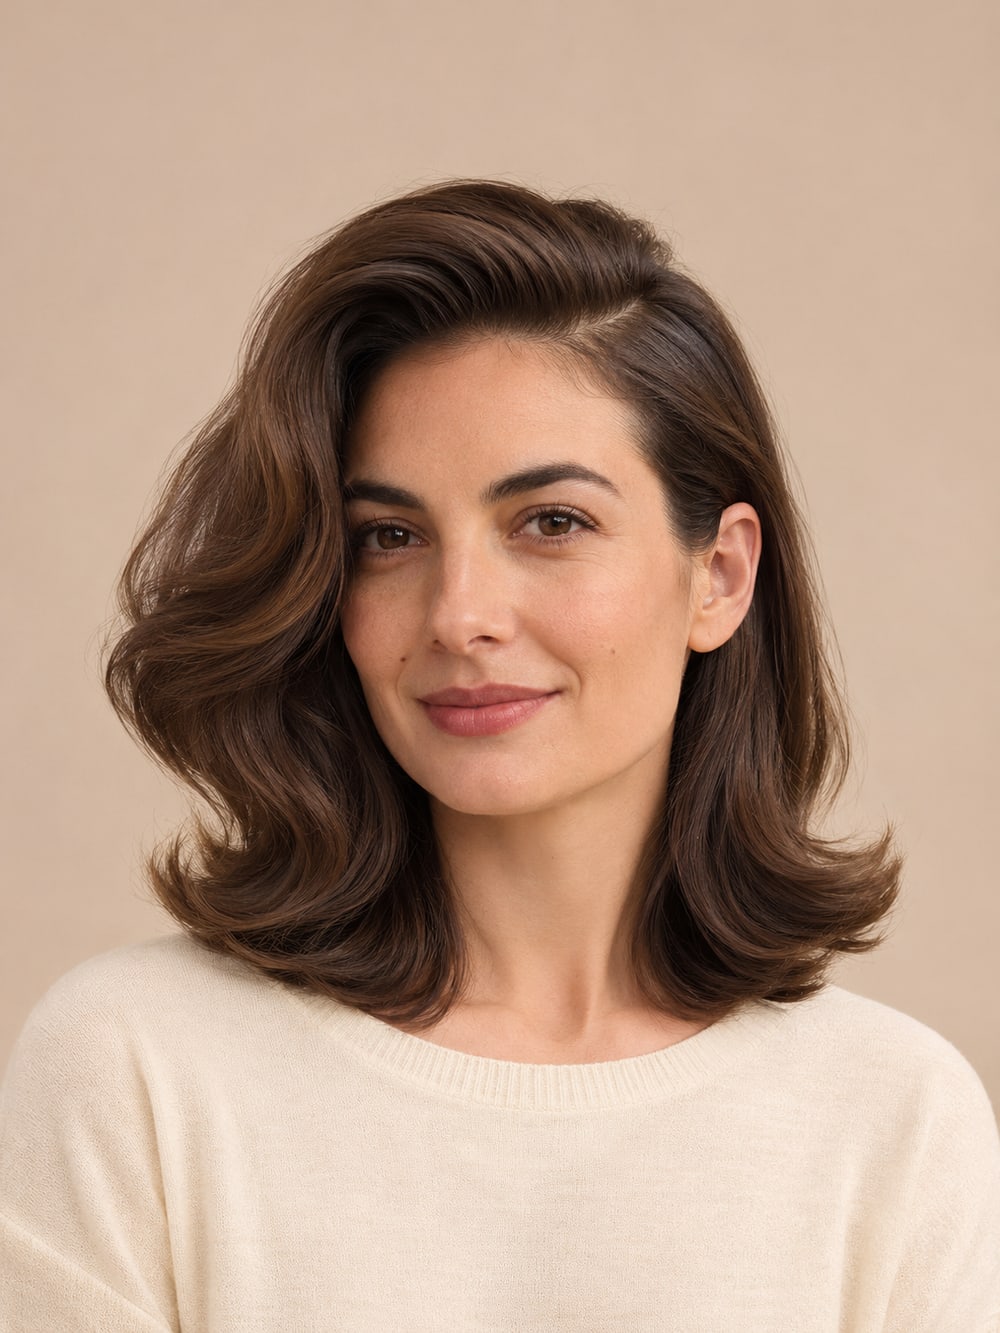
A deep side part, a lifted front, and softly turned ends bring the ’80s blowout to life. Start with a round brush and just two rollers.

· 4 min read · Updated

On this page
In Vogue’s ’80s hair roundup, Cindy Crawford’s side-parted blowout lifts away from her forehead and bends around her cheeks. To make that shape easy to wear at home, put most of the lift on one side and try tucking the other behind your ear. Vogue’s ’80s hair roundup
Start with a deep side part and lift the roots on the fuller side with a round brush. Let that section cool in a roller, then loosen the ends with your fingers. If you’re styling the hair you already have, do the front first. You can decide how much of the rest needs setting once you see the sweep.
Deep side-part blowout with a lifted front, a tucked side, and broad bends through shoulder-length hair
AI-generated editorial illustration of the finished shape.
How to set the side-part blowout
Use a blow dryer, a round brush, two rollers, and clips if the rollers need help staying put. Pick a roller your front section can wrap around comfortably. On a bob, that may mean a smaller roller than the one you’d use on long hair.
1. Find the part while your hair is still damp
Move your usual part slightly toward one temple and look at the front in the mirror. Give yourself enough hair on the fuller side to make a sweep across the forehead. If the roots keep falling into your usual part, dry the front first so you can guide it while it’s still pliable.
2. Lift the front with the round brush
Let the bulk of your hair air-dry partway, then clip it out of the way. Slide the brush under a section on the fuller side of the part and lift it up and slightly back. Aim the airflow along the section from roots toward ends as you draw the brush away from your face. Keep the dryer moving and use its lowest heat setting. Finish with a cool shot if your dryer has one. Chris Appleton’s roller blowout technique · American Academy of Dermatology hair styling guidance
3. Set the front and crown while they cool
Once the front section is dry, wrap its ends around the roller and wind it back toward the roots, away from your face. Blow-dry the section just behind it at the crown and set it on the second roller. Keep both sections on the fuller side so your part stays visible. Clip the rollers if they shift, then leave the sections to cool while you dry the rest. Sam Villa’s guide to setting a blowout
4. Keep the sides and ends soft
Release the clipped hair and blow-dry it in sections. When the brush reaches the last few inches, give it a partial turn away from your cheek and draw it through. On the lighter side, brush the hair back toward the ear and keep the roots closer to the head. Once the sections on top are cool, unwind each roller slowly and free any strands caught around its edge. Use your fingertips to place the front and check the height in profile.
The two-roller shortcut
Set one section at the hairline and another just behind it. Leave the rest of your hair in its usual texture, or spend a pass with the brush on the pieces beside your face. This is especially handy if the ends already have some movement and the top is what goes flat.
- If your hair stops at the chin , let the lifted front do most of the work. Guide the ends around the jaw with the brush, then tuck the lighter side.
- If long hair pulls the front down , divide the front into narrower sections and make sure each one cools completely. Use the second roller at the spot that collapses first.
- If you wear your curls natural , try the same silhouette with a deep part and a diffuser. Lift the roots on the fuller side and use your fingers to place the front. The curl pattern can stay visible.
When the sweep falls flat
If the ends look bouncy but the top still sits flat, put the brush closer to the roots on your next pass. If the front feels too tall, move the part a little closer to center and guide the section across at a lower angle. If the ends look too curled for the shape you wanted, loosen them with your fingers once they’ve cooled.
Give the style one normal outing before you ask for layers. If the part and lift already work with your cut, keep the length and bring the styling reference to your next appointment. If you’re considering a change, use HairWow’s hairstyle try-on to compare the overall shape on your photo. You can judge whether you like the height and where the hair sits around your face. See what your own hair will hold by trying the set in the mirror.
For more shapes from the decade, see HairWow’s guide to ’80s hairstyles for women.